


今回は、プラグインを使わずに、コードを打ち込むことによって、Wordpressのアバターを表示する方法です。
プラグインを使わずにアバターを設定するとなると一般的に、Gravatar(グラバター)を使いますが、登録したりパスワードで保護したりと面倒です。
そのため、簡単にアバターを登録できるコードを紹介します。
以下のコードをテーマのfunctions.phpに貼って下さい。
※ワードプレスの親テーマでも子ページテーマでもどちらのfunctions.phpに貼り付けても実装可能です。
/////////////////////////////////////
// 自前でプロフィール画像の設定
///////////////////////////////////////
//プロフィール画面で設定したプロフィール画像
if ( !function_exists( 'get_the_author_upladed_avatar_url_demo' ) ):
function get_the_author_upladed_avatar_url_demo($user_id){
  if (!$user_id) {
    $user_id = get_the_posts_author_id();
  }
  return esc_html(get_the_author_meta('upladed_avatar', $user_id));
}
endif;

//ユーザー情報追加
add_action('show_user_profile', 'add_avatar_to_user_profile_demo');
add_action('edit_user_profile', 'add_avatar_to_user_profile_demo');
if ( !function_exists( 'add_avatar_to_user_profile_demo' ) ):
function add_avatar_to_user_profile_demo($user) {
?>
  <h3>プロフィール画像</h3>
  <table class="form-table">
    <tr>
      <th>
        <label for="avatar">プロフィール画像URL</label>
      </th>
      <td>
      	<input type="text" name="upladed_avatar" size="70" value="<?php echo get_the_author_upladed_avatar_url_demo($user->ID); ?>" placeholder="画像URLを入力してください">
       <p class="description">Gravatarよりこちらのプロフィール画像が優先されます。240×240pxの正方形の画像がお勧めです。</p>
      </td>
    </tr>
  </table>
<?php
}
endif;

//入力した値を保存する
add_action('personal_options_update', 'update_avatar_to_user_profile_demo');
if ( !function_exists( 'update_avatar_to_user_profile_demo' ) ):
function update_avatar_to_user_profile_demo($user_id) {
  if ( current_user_can('edit_user',$user_id) ){
    update_user_meta($user_id, 'upladed_avatar', $_POST['upladed_avatar']);
  }
}
endif;

//プロフィール画像を変更する
add_filter( 'get_avatar' , 'get_uploaded_user_profile_avatar_demo' , 1 , 5 );
if ( !function_exists( 'get_uploaded_user_profile_avatar_demo' ) ):

function get_uploaded_user_profile_avatar_demo( $avatar, $id_or_email, $size, $default, $alt ) {
  if ( is_numeric( $id_or_email ) )
    $user_id = (int) $id_or_email;
  elseif ( is_string( $id_or_email ) && ( $user = get_user_by( 'email', $id_or_email ) ) )
    $user_id = $user->ID;
  elseif ( is_object( $id_or_email ) && ! empty( $id_or_email->user_id ) )
    $user_id = (int) $id_or_email->user_id;

  if ( empty( $user_id ) )
    return $avatar;

  if (get_the_author_upladed_avatar_url_demo($user_id)) {
    $alt = !empty($alt) ? $alt : get_the_author_meta( 'display_name', $user_id );;
    $author_class = is_author( $user_id ) ? ' current-author' : '' ;
    $avatar = "<img alt='" . esc_attr( $alt ) . "' src='" . esc_url( get_the_author_upladed_avatar_url_demo($user_id) ) . "' class='avatar avatar-{$size}{$author_class} photo' height='{$size}' width='{$size}' />";
  }

  return $avatar;
}
endif;
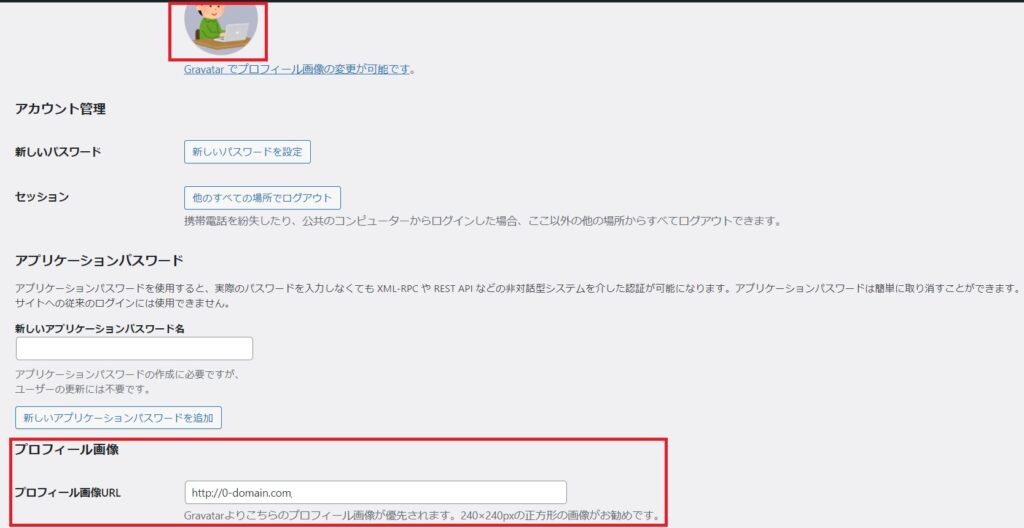
コードを貼るとこの様にプロフィール画像のURLを貼り付ける設定ができますので、あとはWordPressの画像アップロードに設定したい画像をアップし、画像のURLリンクをコピーして貼り付ければ設定完了です。

画像リンクはメディアライブラリの右下の部分ですね。
ちなみに、テーマを更新すると消えますがテーマを更新したらコードを貼ると元に戻ります。

コメント